


 Tested ✓ Working
TP.MS3663S.PB818 Firmware Dump – Lobod LX-32DN52-T2S2 SPI Flash Download
Overview
This page provides the official SPI flash firmware dump for the Lobod LX-32DN52-T2S2 television equipped with the TP.MS3663S.PB818 main board. This dump has been extracted, verified, and tested in a professional repair environment, confirmed to be 100% functional. It is designed to resolve a wide range of memory-related failures that commonly occur on this board revision.
The firmware targets the 25Q64 BIOS SPI flash chip and must be programmed using the RT809H EEPROM programmer. The dump file supports full restoration of factory-corrupted or blank SPI memory resulting from failed OTA updates, power surges, or improper manual updates.
Common Issues – Lobod LX-32DN52-T2S2
The following symptoms indicate SPI memory corruption or firmware failure on the TP.MS3663S.PB818 board:
- TV stuck on standby: LED blinks continuously but the TV fails to boot into the main interface.
- Black screen with sound: Audio is present but the panel remains completely dark after power-on.
- No signal on all inputs: HDMI, AV, and Tuner all display “No Signal” despite valid sources being connected.
- Boot loop: TV powers on, shows logo or splash screen, then restarts repeatedly without completing the boot sequence.
- Factory reset failure: Attempting a factory reset via service menu results in an incomplete reset or error loop.
- Corrupted OTA update: Firmware update interrupted by power failure, leaving SPI memory in an inconsistent state.
- White screen or distorted display: Panel shows a white, pink, or color-distorted image due to corrupted panel configuration data stored in SPI.
- Remote control unresponsive: IR receiver detects signals but no commands are processed due to corrupted firmware logic.
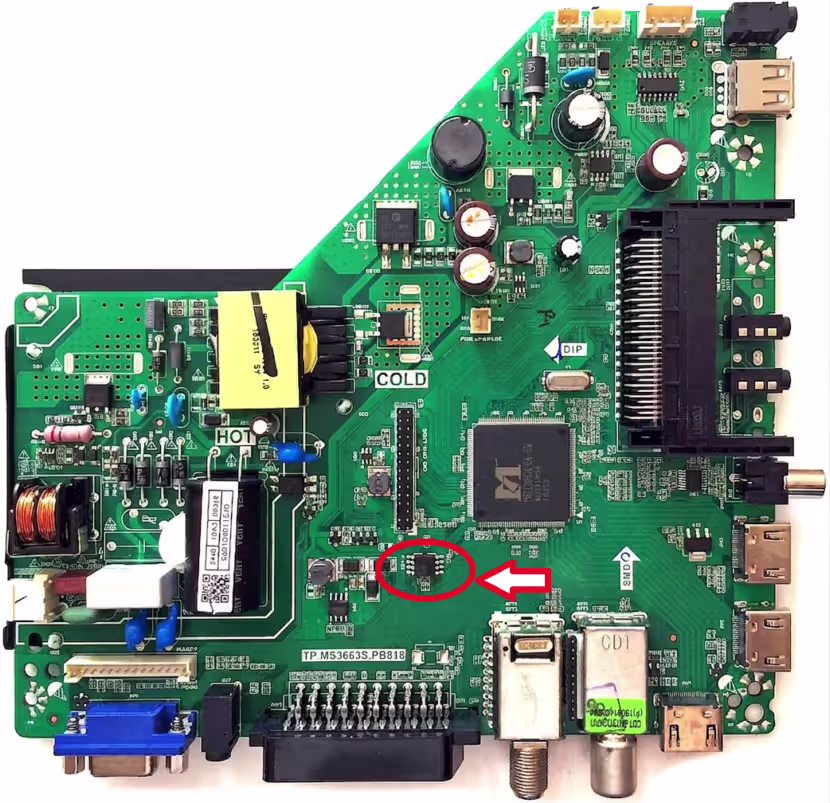
SPI Flash Chip Location
Diagnostic & Repair Protocol
Follow this structured protocol to correctly diagnose and repair the TP.MS3663S.PB818 board using the SPI firmware dump:
-
1Visual Inspection
Inspect the main board for burned components, swollen capacitors, cold solder joints, and physical damage around the SPI chip area before attempting any firmware operation.
-
2Power Supply Verification
Measure voltages at standby and main power rails. Confirm 3.3V and 5V are stable. Faulty power supply can cause SPI read/write errors that mimic firmware corruption.
-
3SPI Chip Identification
Locate the 25Q64 SPI chip on the TP.MS3663S.PB818 board. Verify markings with a magnifier. Confirm it is the 8-pin SOIC package with correct manufacturer code (W25Q64 or equivalent).
-
4Original Backup
Before writing, connect RT809H programmer with SOIC-8 clip to the chip in-circuit (power off the TV). Read the original chip content and save as a backup file on your computer.
-
5Download & Load Firmware
Download the tested dump file from the section below. Open RT809H software, select chip model W25Q64, load the downloaded firmware file, and verify the file size matches (8MB).
-
6Erase and Write
Execute Erase, then Write operations in sequence. Do not interrupt the process. Writing typically takes 60–120 seconds with RT809H on the 25Q64 chip.
-
7Verify the Flash
After writing, run the Verify function in RT809H to confirm the written data matches the firmware file. A successful verify confirms the flash operation is complete.
-
8Power On & Test
Disconnect the programmer clip and power on the TV. The set should boot normally, display the Lobod logo, and proceed to the main menu without errors. Test all inputs and functions.
Complete step-by-step video guide: SPI firmware flashing on TP.MS3663S.PB818 using RT809H programmer.


