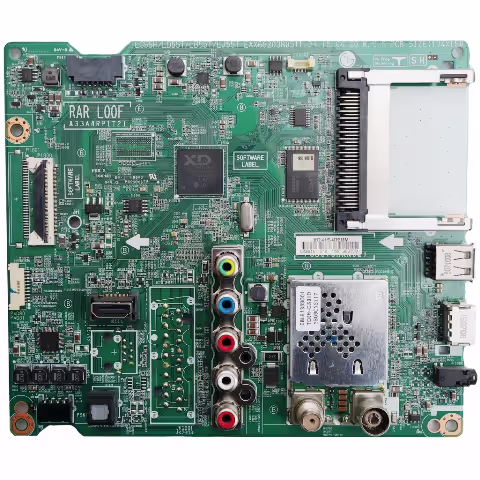
EAX66203805(1.2) LG 32LF550U-ZA TV NAND Firmware Dump
Complete memory firmware dump for LG 32LF550U-ZA television repair. Fixes slow remote control response, stuck boot logo, dead mainboard, and all NAND-related failures. Tested 100% working.
Technical Specifications
| TV Model | LG 32LF550U-ZA |
| Main Board | EAX66203805(1.2) |
| Panel | NC320DXN VSBP8 |
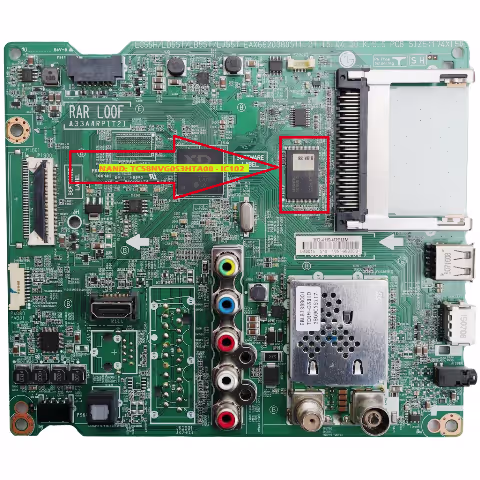
| SPI Flash | MX25L8035 — IC1300 |
| NAND Flash | TC58NVG0S3HTA00 — IC102 |
| Programmer | RT809H Universal Programmer |
| Dump Type | Full NAND Binary Dump |
| Status | ✔ Tested & Working |
Known Issues This Firmware Fixes
Dead TV — No Power Response
TV does not power on at all despite functioning power supply. Mainboard fails to initialize due to corrupted NAND boot sector. Standby LED may or may not illuminate.
Stuck on LG Logo — Boot Loop
TV powers on, displays LG logo, but never reaches home screen. Continuous reboot cycle caused by corrupted system partition in NAND memory. May show brief backlight flicker between loops.
Extremely Slow Remote Control Response
Remote control commands execute with 3-10 second delays. Channel changes, volume adjustments, and menu navigation severely lagged. Caused by NAND read errors forcing repeated data access attempts.
Backlight On — No Picture, No OSD
Screen backlight activates normally but no image, no on-screen display, no menu appears. Audio may or may not function. Indicates main software corruption while hardware remains functional.
Software Corruption After Power Surge
TV stopped working correctly after electrical surge or sudden power loss during firmware update. NAND contents partially overwritten or corrupted by voltage spike event.
Channel List Lost — Settings Reset Failure
TV loses all stored channels and settings repeatedly. Factory reset through service menu fails to resolve. User data partition in NAND has bad blocks preventing write operations.
Freezing & Random Shutdown
TV freezes during operation at random intervals, sometimes followed by automatic shutdown. Screen may display artifacts before freeze. Caused by NAND read failures during runtime data access.
No Audio Output — All Sources
Picture displays normally but no audio from internal speakers or headphone jack across all input sources. Audio codec firmware stored in NAND is corrupted or missing.
Diagnostic & Repair Protocol
Visual Inspection & Power Supply Verification
Inspect the EAX66203805(1.2) mainboard for burnt components, swollen capacitors, or cracked solder joints. Verify all DC output voltages from the power supply board are within specification before proceeding with memory diagnostics.
Desolder NAND Flash IC102
Using a hot air rework station set to 350°C with medium airflow, carefully desolder the TC58NVG0S3HTA00 NAND flash chip from position IC102. Apply flux paste generously around all pins before heating. Lift the chip with precision tweezers once solder flows.
Clean & Prepare NAND Chip
Clean residual solder from NAND chip pins using solder wick and flux. Inspect pins under magnification for damage or bridging. Clean the mainboard pads at IC102 position. Ensure all surfaces are free of flux residue and contamination.
Read Original Dump (Backup)
Place the NAND chip into the RT809H programmer with TSOP48 adapter. Detect the TC58NVG0S3HTA00 chip in software. Read and save the original corrupted dump as backup before any write operations. This allows comparison analysis.
Erase & Write New Firmware
Perform a full chip erase on the TC58NVG0S3HTA00. Load the downloaded firmware dump file into RT809H software. Execute the write operation. After writing, perform a verify operation to ensure the written data matches the firmware file with zero errors.
Resolder NAND & Reassemble
Apply fresh solder paste to IC102 pads on the mainboard. Align the programmed NAND chip carefully matching pin 1 indicator. Reflow using hot air at 340°C. Inspect all solder joints under magnification. Clean flux residue with IPA.
Functional Testing & Validation
Reconnect all cables and power on the TV. Verify successful boot to home screen. Test all functions: remote control response, channel tuning and storage, all input sources, audio output, menu navigation, USB playback, and settings retention after power cycle.
Repair Video Tutorial
⬇ Download Firmware Dump
EAX66203805(1.2) — LG 32LF550U-ZA — NAND TC58NVG0S3HTA00
Important: This firmware dump is for professional TV repair technicians only. Incorrect flashing can permanently damage the mainboard. Always back up the original NAND content before writing. Use RT809H programmer with TSOP48 adapter only.