T.SIS231.81 Firmware Dump
STARLIGHT SL40V8100LED — 25Q64 SPI Fix
Resolve memory corruption & boot failures with this tested SPI dump — RT809H programmer method
This guide provides the complete T.SIS231.81 SPI firmware dump for the STARLIGHT SL40V8100LED television. The dump targets the Winbond 25Q64 flash memory chip and is programmed using the RT809H universal programmer. This resource is intended exclusively for qualified electronics technicians performing board-level repairs.
Device Specifications
| Brand | STARLIGHT |
| Model | SL40V8100LED |
| Main Board | T.SIS231.81 |
| Panel | DTW400LL01-D |
| SPI Flash Chip | 25Q64 (Winbond / compatible) |
| Chip Capacity | 64 Mbit (8 MB) |
| Programmer | RT809H Universal Programmer |
| Firmware Status | 100% Tested & Working |
| File Format | .BIN (Raw SPI Dump) |
Known Issues – STARLIGHT SL40V8100LED
The following symptoms are associated with firmware corruption or SPI memory failure on this model:
- TV powers on but shows a blank / black screen with backlight active
- Stuck on boot logo — infinite restart loop without reaching home screen
- No signal detected on any input source after power-on
- No picture, no sound with only power LED blinking
- Remote control and front panel buttons unresponsive
- TV does not turn on at all — standby LED off
- Menu appears corrupted or displays garbled text/graphics
- Spontaneous power cycling without user input
- Software update attempts result in brick or failure
- EEPROM / NVM data loss after power surge or lightning strike
Diagnostic & Repair Protocol
Phase 1 — Initial Diagnosis
| Check Point | Expected Result | Action if Failed |
| Standby LED | Red LED ON | Check power supply 5VSB rail & fuse |
| Main 12V Rail | 12.0V ±0.5V | Replace PSU or check capacitors |
| 3.3V SPI Supply | 3.3V steady | Check LDO regulator near SPI chip |
| Boot Process | Logo appears within 8 sec | Firmware reflash required |
| 25Q64 Chip ID | Read via RT809H: EF 40 17 | Replace chip if ID unreadable |
| Panel Voltage | DTW400LL01-D: LVDS signal present | Check TCON connector & cables |
Phase 2 — SPI Firmware Reflash Procedure
Install the latest RT809H software on your PC. Connect the programmer via USB and verify device detection in the software interface.
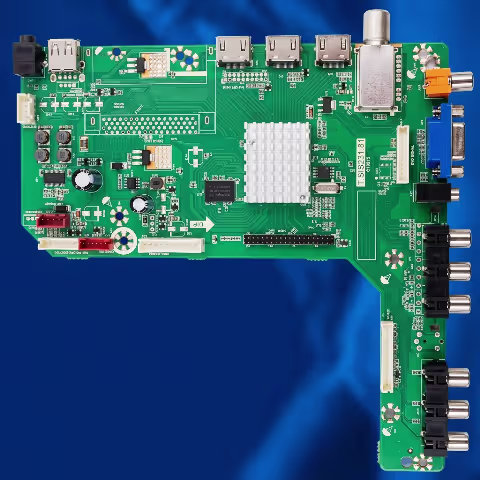
Disconnect mains power completely. Locate the 25Q64 SPI flash chip on the T.SIS231.81 main board. Refer to the SPI chip image below for exact location.
Attach the RT809H SOIC8 clip directly to the 25Q64 chip while still on the board. Ensure pin 1 orientation is correct (marked dot on chip).
Before writing, always perform a Read operation to save the original firmware as a backup. Select chip: W25Q64 in the RT809H software.
Load the downloaded .BIN firmware file. Execute Erase → Blank Check → Program → Verify sequence. Do not interrupt the process.
Remove the SOIC8 clip, reconnect the TV power cable, and power on. TV should boot normally within 10–15 seconds.
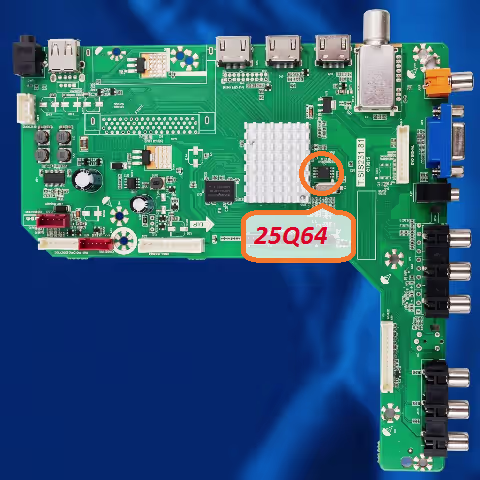
SPI Flash 25Q64 — T.SIS231.81 Board Location Reference — Use RT809H SOIC8 Clip
Video Tutorial — RT809H SPI Flash Procedure
Download SPI Firmware Dump
T.SIS231.81 — STARLIGHT SL40V8100LED — 25Q64 — 8MB — Tested 100%
Step 1: Sponsor page opens in new tab • Step 2: Auto-redirect to firmware file in 4 seconds
Phase 3 — Post-Repair Verification
| Test | Expected Outcome | Status |
| Cold Boot Test | TV boots to home screen in <15 sec | Pass |
| Channel Scan | DVB-T/C channels detected normally | Pass |
| HDMI Input | Signal detected & displayed correctly | Pass |
| Audio Output | Speakers produce clear audio | Pass |
| Remote Control | All buttons respond correctly | Pass |
| Standby Cycle | Standby/wake cycle functions normally | Pass |
Recommended Tools & Equipment
| Programmer | RT809H Universal EPROM Programmer |
| Clip | SOIC8 SOP8 Test Clip with cables |
| Software | RT809H PC Software (latest version) |
| Multimeter | Digital multimeter for voltage checks |
| Soldering Iron | Temperature-controlled station (for chip replacement) |
| Hot Air | Rework station (if chip requires replacement) |