For Qualified Technicians Only. This firmware dump requires hardware-level programming using an SPI flash programmer. Incorrect flashing may permanently damage the main board. Proceed only if you have professional repair experience.
Overview
This article provides a verified and tested SPI firmware dump for the Vivax TV-32LE73 television equipped with the TP.SIS 231.P851 main board. The dump targets the 25Q64 (64Mbit) SPI flash memory and is designed to resolve critical memory-related failures.
The firmware binary has been extracted, verified, and re-flashed successfully using the RT809H universal programmer. This is a complete memory image that restores the TV to full factory-operational status.
Main Board Identification
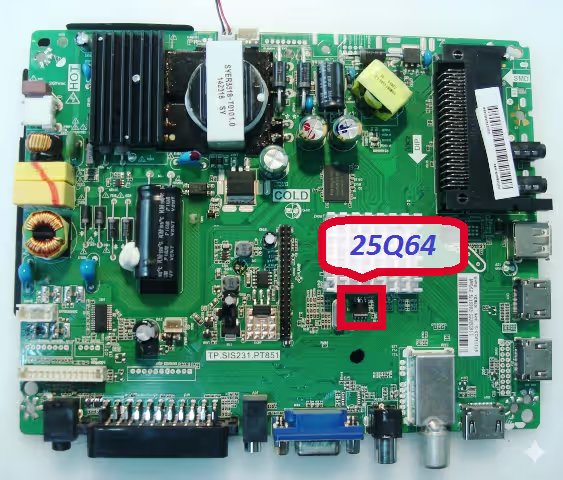
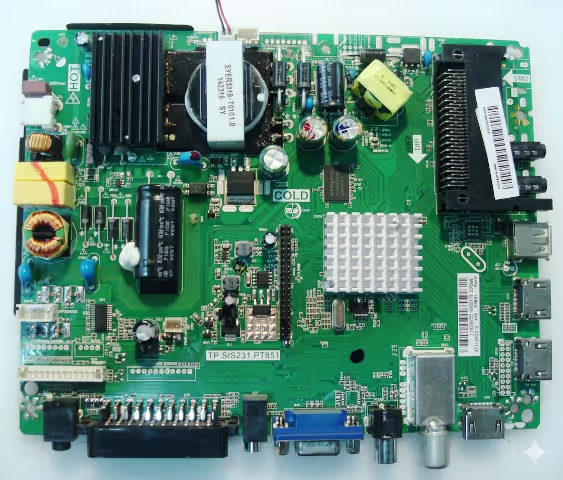
Before proceeding, confirm your main board matches the TP.SIS 231.P851 layout shown below. Verify the board markings, IC placement, and connector positions.
TP.SIS 231.P851 Main Board – Click image to zoom in new tab
SPI Flash Memory Location
The 25Q64 SPI flash chip is located near the main processor. This 8-pin SOIC package holds the complete firmware including bootloader, channel data, and system configuration.
25Q64 SPI Memory Chip Position – Click image to zoom in new tab
Firmware Specifications
Brand
Vivax
Model
TV-32LE73
Main Board
TP.SIS 231.P851
Compatible Panels
LC320EXJ-SEE1 / HV320WX2-206 / PT851 T3151A04-3
SPI Flash Memory
25Q64 (64Mbit / 8MB)
Programmer
RT809H Universal Programmer
File Type
Full SPI Dump (.bin)
Firmware Status
100% Tested and Working
Last Updated
09 June 2026
Common Issues Resolved by This Firmware
The following symptoms on the Vivax TV-32LE73 with TP.SIS 231.P851 board are directly addressed by reflashing the SPI memory with this verified dump:
TV stuck on standby LED
No power / Dead set
Boot loop / Restart cycle
Backlight on, no display
Logo freeze at startup
Corrupted EEPROM data
No HDMI / AV signal
Software update failure
Diagnostic and Repair Protocol
Follow this systematic procedure to diagnose the fault and successfully flash the firmware dump onto the Vivax TV-32LE73 main board.
Phase 1: Pre-Repair Diagnostics
1
Visual Inspection: Examine the TP.SIS 231.P851 board for burnt components, swollen capacitors, cracked solder joints, or damaged traces around the SPI flash area.
2
Power Supply Verification: Confirm all voltage rails are within specification: 5V standby, 12V main, and 3.3V logic supply to the SPI chip. Use a multimeter at the designated test points.
3
SPI Chip Continuity Test: Verify the 25Q64 chip is not physically damaged. Check pin continuity and confirm the VCC (pin 8) reads 3.3V during standby power.
Phase 2: Firmware Extraction (Backup)
4
Desolder the 25Q64 Chip: Using a hot-air rework station at 320-350 degrees Celsius, carefully remove the SPI chip from the board. Apply flux and use low airflow to avoid disturbing adjacent components.
5
Read Original Dump: Place the chip in the RT809H programmer with the correct SOIC8 adapter. Select W25Q64 from the chip database. Perform a full read and save the backup file.
Phase 3: Firmware Flashing
6
Erase the Chip: Execute a full erase cycle on the 25Q64 using the RT809H software. Verify the chip reads all 0xFF after erasure.
7
Write the Firmware Dump: Load the downloaded .bin firmware file into the RT809H software. Click Write and wait for the process to complete without errors.
8
Verify the Flash: Use the Verify function to compare the written data against the source file. A 100% match confirms a successful flash operation.
Phase 4: Reassembly and Testing
9
Resolder the Chip: Carefully solder the 25Q64 back onto the board pads using flux and a fine-tip soldering iron or hot-air station. Inspect all 8 pins under magnification for bridges.
10
Power-On Test: Reconnect the panel, power supply, and IR sensor. Power on the TV and verify boot sequence, logo display, menu access, HDMI input, and audio output. The TV should operate normally.
Video Repair Guide
Watch the complete step-by-step firmware dump and flashing procedure for this board:
Download Firmware Dump
SPI 25Q64 full binary dump for TP.SIS 231.P851 – Vivax TV-32LE73
Contains information related to marketing campaigns of the user. These are shared with Google AdWords / Google Ads when the Google Ads and Google Analytics accounts are linked together.
90 days
__utmz
Contains information about the traffic source or campaign that directed user to the website. The cookie is set when the GA.js javascript is loaded and updated when data is sent to the Google Anaytics server
6 months after last activity
__utmc
Used only with old Urchin versions of Google Analytics and not with GA.js. Was used to distinguish between new sessions and visits at the end of a session.
End of session (browser)
__utmb
Used to distinguish new sessions and visits. This cookie is set when the GA.js javascript library is loaded and there is no existing __utmb cookie. The cookie is updated every time data is sent to the Google Analytics server.
30 minutes after last activity
__utmt
Used to monitor number of Google Analytics server requests
10 minutes
__utma
ID used to identify users and sessions
2 years after last activity
__utmv
Contains custom information set by the web developer via the _setCustomVar method in Google Analytics. This cookie is updated every time new data is sent to the Google Analytics server.
2 years after last activity
_gat
Used to monitor number of Google Analytics server requests when using Google Tag Manager
1 minute
_gid
ID used to identify users for 24 hours after last activity
24 hours
_ga_
ID used to identify users
2 years
_gali
Used by Google Analytics to determine which links on a page are being clicked
30 seconds
_ga
ID used to identify users
2 years
__utmx
Used to determine whether a user is included in an A / B or Multivariate test.


 Firmware Dump
100% Tested
Firmware Dump
100% Tested