SINHO-090-V594C0-00 Firmware Dump
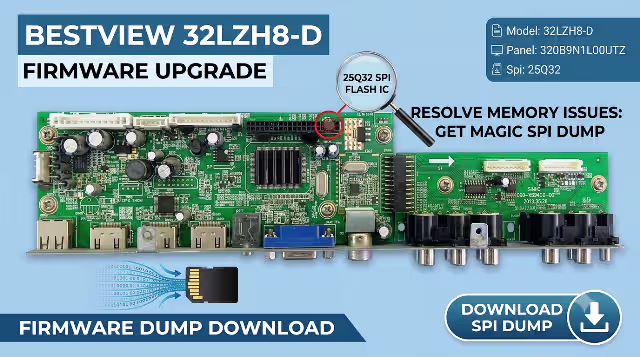
BESTVIEW 32LZH8-D
25Q32 SPI Flash Memory Dump — Tested & Verified 100% Working
Table of Contents
⚙ Firmware Specifications
Ensure the panel model matches 320B9N1L00UTZ before flashing to avoid display incompatibility.
📌 Main Board Identification
Locate the SINHO-090-V594C0-00 marking printed on the main board PCB. Verify the board revision matches before proceeding with the firmware flash. Click the image below to inspect the board layout in full resolution.
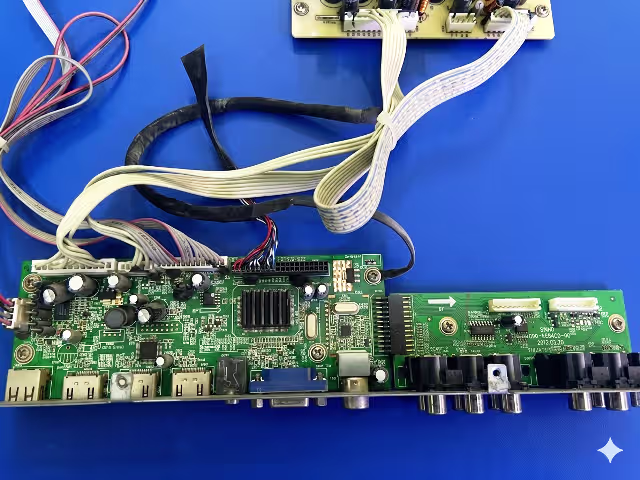 Main Board
🔍 Click to Zoom
Main Board
🔍 Click to Zoom
🔌 SPI Chip Location & Index
The 25Q32 SPI flash memory chip stores all firmware data including boot loader, channel map, and system configuration. The image below highlights the exact chip position and pin-1 orientation on the SINHO-090-V594C0-00 board.
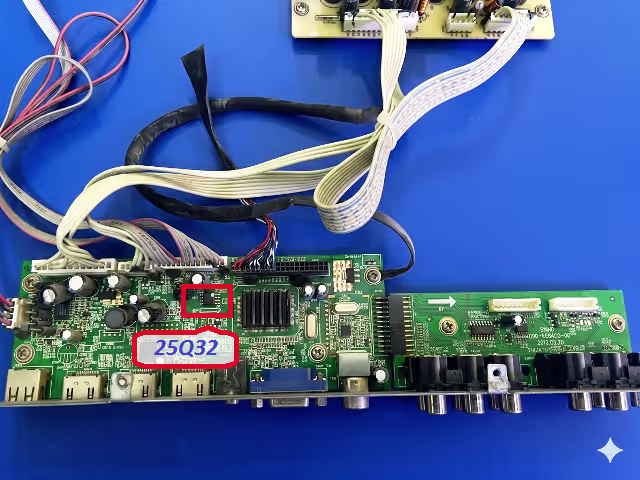 SPI 25Q32 Index
🔍 Click to Zoom
SPI 25Q32 Index
🔍 Click to Zoom
🔧 Common Issues & Symptoms
The following failures on the BESTVIEW 32LZH8-D are typically caused by corrupted or degraded 25Q32 SPI flash memory and are resolved by reflashing the firmware dump:
- Dead TV — No Standby LED: Unit draws no power; standby indicator completely off despite confirmed PSU output voltage
- Stuck on Boot Logo: TV powers on but freezes at the BESTVIEW splash screen in an infinite boot loop
- Backlight ON, No Picture: LED backlight illuminates but screen remains black with no OSD response
- Audio Without Video: Sound plays normally through speakers but display shows no image output
- EEPROM Corruption Error: System enters service mode automatically or displays factory reset loop
- Channel Auto-Search Failure: Tuner scanning freezes at 0% or fails to store any channels after scan completes
- OSD Menu Freezing: On-screen display becomes unresponsive or shows garbled text and corrupted icons
- Random Rebooting: Television restarts spontaneously during normal operation at irregular intervals
🛠 Diagnostic & Repair Protocol
Required Tools
- RT809H Universal SPI Programmer
- SOP8 test clip or desoldering station
- Firmware binary file (download below)
- RT809H software (latest version)
- Antistatic wrist strap and ESD-safe mat
Step-by-Step Flashing Procedure
- Power Safety: Disconnect the TV from AC mains completely. Wait 60 seconds for capacitor discharge before handling the main board.
- Access the Board: Remove the rear cover screws and carefully detach all ribbon cables and wire harnesses from the SINHO-090-V594C0-00 main board.
- Locate the 25Q32 Chip: Identify the SPI flash using the index image above. Note the Pin-1 dot marking on the chip body.
- Connect the Programmer: Attach the SOP8 clip to the 25Q32 chip, aligning Pin-1 with the red wire on the clip. Connect the clip cable to the RT809H programmer.
- Backup Original Dump: Open RT809H software, auto-detect the chip as 25Q32, and read the current firmware. Save this backup file before making any changes.
- Flash the Firmware: Load the downloaded SINHO-090-V594C0-00 binary dump file. Execute Erase → Program → Verify sequence. Ensure verification completes with zero errors.
- Reassemble & Test: Disconnect the programmer, reassemble the TV, and power on. The unit should boot normally within 8-12 seconds to the home screen.
🎥 Video Repair Guide
Watch the complete step-by-step firmware flashing tutorial for the SINHO-090-V594C0-00 board. This guide covers chip identification, programmer setup, and verification process.
Video demonstrates the complete RT809H flashing procedure applicable to BESTVIEW 32LZH8-D with 25Q32 SPI memory.
Download SINHO-090-V594C0-00 Firmware
25Q32 SPI Binary Dump — BESTVIEW 32LZH8-D — Verified Working
❓ Frequently Asked Questions
📤 Share This Firmware
Help fellow technicians find this repair resource