 FOR TECHNICIANS ONLY
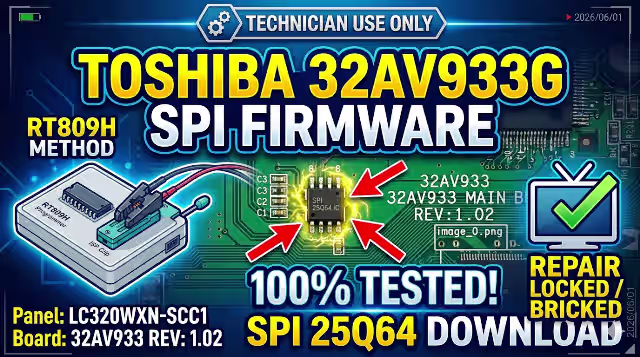
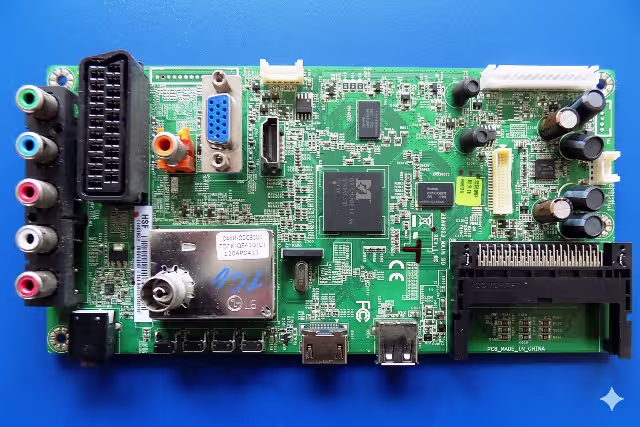
32AV933 Firmware Dump – TOSHIBA 32AV933G SPI Flash Download
Main Board REV 1.02 • SPI 25Q64 • 100% Tested Working
Firmware Overview
This is the verified SPI memory dump for the TOSHIBA 32AV933G television. The firmware binary has been extracted directly from the 25Q64 SPI flash chip located on the 32AV933 MAIN BD REV 1.02 main board using the RT809H universal programmer. This dump resolves critical memory corruption issues that cause the TV to fail during boot, display no picture, or remain completely dead with no standby indicator.
The firmware has been tested and verified 100% working on production units. It is intended exclusively for qualified television repair technicians who have experience with SPI flash programming procedures.
Firmware Verified & TestedTechnical Specifications
SPI Flash Chip Location
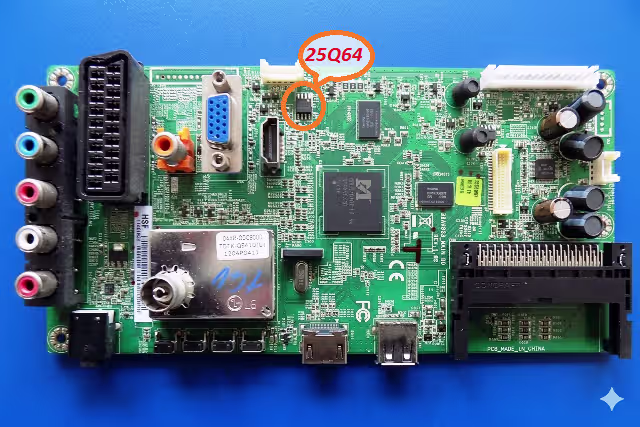
25Q64 SPI Flash IC location on the 32AV933 MAIN BD REV 1.02 – Desolder or use clip for in-circuit reading
Common Issues & Symptoms
The following faults are commonly associated with SPI flash memory corruption on the TOSHIBA 32AV933G. If your unit exhibits any of these symptoms, reflashing the SPI dump is the recommended repair procedure:
- Dead TV – No Standby LED: The television shows no signs of power. The standby LED does not illuminate. The power supply is functional but the main board fails to initialize due to corrupted boot data in the SPI flash.
- Stuck on TOSHIBA Logo (Boot Loop): The TV powers on and displays the TOSHIBA startup logo but never progresses to the home screen or TV input. It may restart repeatedly in an endless boot cycle.
- No Picture – Sound Only: Audio output functions normally through speakers but the LCD panel remains black or shows no image. The backlight may or may not be active. This indicates partial firmware corruption affecting the video processing initialization.
- EEPROM Data Corruption: The channel list is lost, settings reset to default on every power cycle, or the TV displays error messages related to memory or software integrity.
- Main Board Not Initializing: The microprocessor on the main board fails to execute startup code. No communication is established with the T-CON board or the panel. The unit appears completely unresponsive.
- Frozen Screen on Input: The TV boots successfully but freezes on a specific input or menu screen and becomes unresponsive to remote control or button commands.
- Backlight On but No OSD: The backlight activates confirming the power supply and LED driver are operational, but no On-Screen Display or image appears, indicating the main processor cannot read valid firmware from the SPI chip.
Diagnostic & Repair Protocol
Required Equipment
- RT809H Universal Programmer with SPI flash adapter or SOP8 test clip
- Soldering station with hot air rework capability (if desoldering the chip)
- Multimeter for voltage verification on the main board
- Computer with RT809H software installed
- Downloaded 32AV933 SPI firmware binary file
Step-by-Step Flashing Procedure
- Power Safety: Disconnect the television from the AC mains supply completely. Discharge any residual capacitor voltage on the power supply board. Wait a minimum of 60 seconds before proceeding.
- Access the Main Board: Remove the rear cover screws and carefully detach the back panel. Locate the 32AV933 MAIN BD REV 1.02 main board. Identify the 25Q64 SPI flash chip using the reference image provided above.
- Connect the Programmer: Option A – Use an SOP8 test clip to connect directly to the SPI chip while it remains on the board (in-circuit method). Ensure all flat cables and connectors to the main board are disconnected first. Option B – Desolder the 25Q64 chip using a hot air station and place it in the SPI socket adapter on the RT809H.
- Read Before Write: Open the RT809H software. Select the chip model W25Q64 from the database. Perform a full read of the existing chip contents and save this backup file. This preserves the original data in case a rollback is needed.
- Erase the Chip: Execute a full chip erase operation. Verify the erase was successful by confirming all bytes read as
0xFFacross the entire 8 MB address space. - Write the Firmware: Load the downloaded 32AV933 firmware BIN file into the RT809H software buffer. Click Write to flash the binary data to the 25Q64 chip. Wait for the operation to complete without interruption.
- Verify the Flash: Run the Verify function to compare the chip contents against the loaded firmware file. The verification must return a 100% match with zero byte errors. If verification fails, repeat the erase and write process.
- Reassemble and Test: If the chip was desoldered, resolder it back to the main board ensuring proper orientation and alignment of pin 1. Reconnect all flat cables and connectors. Replace the rear cover. Connect AC power and test the TV for normal boot, picture, sound, and menu functionality.
Video Repair Guide
Watch the complete firmware flashing procedure for the TOSHIBA 32AV933G main board:
TOSHIBA 32AV933G – SPI 25Q64 Firmware Dump Flashing with RT809H Programmer
Download Firmware
Click Step 1 to unlock, then click Step 2 to download the firmware file. For technician use only.