
TP.SIS231.PT85 Firmware Overview
This page provides the verified SPI firmware dump for the Hisense LTDN40D36EU television equipped with the TP.SIS231.PT85 main board. The dump file targets the GD25Q64 flash memory and has been extracted, cleaned, and tested to resolve critical memory-related failures including boot loops, stuck logos, black screens, and corrupted EEPROM data.
Whether you are dealing with a completely dead set caused by firmware corruption or a panel that refuses to initialize, this dump is your go-to solution. The file is ready to flash using the SP8 universal programmer and requires no additional editing or hex modification.
Hardware Specifications
| Brand | Hisense |
| Model | LTDN40D36EU |
| Main Board | TP.SIS231.PT85 |
| Panel | JHD400GF-E32 |
| SPI Flash | GD25Q64 (64Mbit / 8MB) |
| Programmer | SP8 Universal Programmer |
| File Format | .bin (Binary Dump) |
| Firmware Status | Tested 100% Working |
Main Board Identification
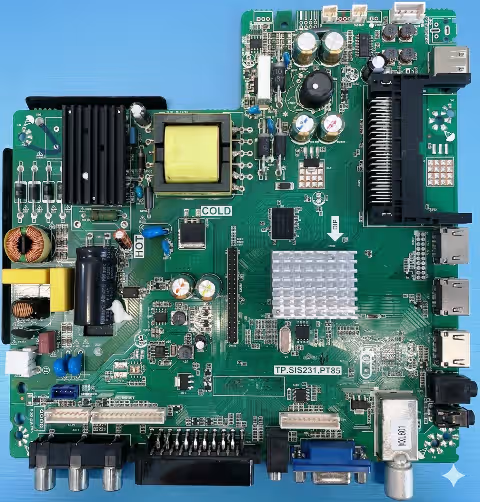
Below is the TP.SIS231.PT85 main board used in the Hisense LTDN40D36EU. Click the image to open a full-resolution view for component identification and SPI chip location.
 Click to zoom
TP.SIS231.PT85 Main Board – Hisense LTDN40D36EU
SPI Flash Chip Location
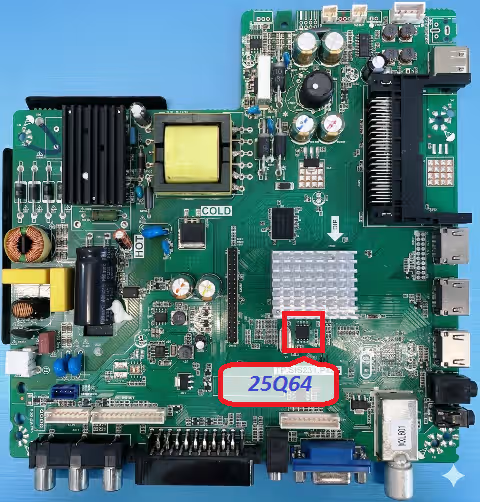
The GD25Q64 SPI flash memory chip stores all firmware, boot configuration, and channel data. Locate it on the board as shown below before desoldering for programming.
 Click to zoom
GD25Q64 SPI Flash Chip – TP.SIS231.PT85 Board
Common Issues Resolved by This Firmware
The following symptoms on the Hisense LTDN40D36EU are typically caused by corrupted SPI flash data and can be resolved by re-flashing the GD25Q64 chip with this verified dump:
- TV completely dead with no standby LED response
- Stuck on Hisense boot logo with infinite loop
- Black screen with backlight ON but no OSD or picture
- Automatic restart or reboot cycle every few seconds
- No signal on all HDMI and AV input sources
- Sound present but no picture displayed on panel
- OSD menu freezing or showing corrupted characters
- TV turns ON then immediately shuts OFF
- Channel list lost or unable to store after factory reset
- Software update failure causing brick state
- Panel backlight flashes once then goes dark
- Remote control not responding despite good IR sensor
Diagnostic & Repair Protocol
Follow this step-by-step professional repair protocol to diagnose the issue, flash the firmware, and verify successful repair of the Hisense LTDN40D36EU.
Phase 1: Initial Diagnosis
- Disconnect the TV from mains power and discharge all capacitors on the power supply board before handling components.
- Perform a thorough visual inspection of the TP.SIS231.PT85 board for burnt traces, swollen capacitors, damaged resistors, or cold solder joints near the SPI area.
- Verify that the power supply outputs correct voltages (5V standby, 12V main) before suspecting firmware failure.
- Confirm the backlight inverter section is functional by checking LED strip continuity and driver IC output.
Phase 2: SPI Chip Extraction
- Locate the GD25Q64 SPI chip on the main board using the reference image above. It is typically near the main processor IC.
- Apply flux generously around the SPI chip pins to facilitate clean desoldering.
- Using a hot air rework station set between 320°C and 350°C, carefully desolder the GD25Q64 chip. Avoid prolonged heat exposure to surrounding components.
- Clean the chip pads on both the IC and the board with solder wick and isopropyl alcohol.
Phase 3: Firmware Programming
- Insert the GD25Q64 chip into the SP8 universal programmer with correct pin orientation (pin 1 dot aligned).
- Read the existing firmware and save it as a backup file before proceeding.
- Erase the chip completely to ensure a clean write operation.
- Load the downloaded TP.SIS231.PT85 firmware dump file (.bin) into the SP8 software.
- Write the firmware to the chip and wait for the process to complete without interruption.
- Run the Verify function to confirm the written data matches the source file with zero byte errors.
Phase 4: Reassembly & Testing
- Resolder the programmed GD25Q64 chip back onto the TP.SIS231.PT85 board. Inspect all solder joints under magnification for bridges or cold joints.
- Reconnect all board cables: LVDS panel cable, power supply connector, IR sensor, and speaker wires.
- Power on the TV and verify the Hisense logo appears followed by normal boot sequence.
- Test all inputs (HDMI, USB, AV), OSD menu navigation, volume control, channel tuning, and remote control response.
- Perform a factory reset from the service menu to initialize all settings for the JHD400GF-E32 panel.
Video Tutorial: Firmware Flashing Guide
Watch the complete walkthrough for extracting, programming, and verifying the SPI firmware dump on the TP.SIS231.PT85 main board.
Download Firmware Dump File
GD25Q64 SPI Flash • TP.SIS231.PT85 • Hisense LTDN40D36EU • .bin format
Click once to continue, then click again to start your download.
Related Firmware Downloads
Frequently Asked Questions
What SPI chip does the TP.SIS231.PT85 use?
The TP.SIS231.PT85 main board uses the GD25Q64 SPI flash memory chip, which has a capacity of 64Mbit (8MB). This chip stores the entire firmware, boot loader, and user configuration data.
Which programmer is recommended for flashing the GD25Q64?
The SP8 universal programmer is the recommended tool for reading, erasing, writing, and verifying the GD25Q64 SPI chip. It provides reliable results with fast programming speed and supports a wide range of SPI flash ICs.
Is this firmware tested and working?
Yes, this TP.SIS231.PT85 firmware dump has been tested 100% working on the Hisense LTDN40D36EU with the JHD400GF-E32 panel. The file was verified with zero byte errors after programming.